You know what I love about summer? All the fresh produce in the stores! So many types of fruit and veggies come out of hiding (or at least I just notice them) and I feel so creative on what I can do with them.
This was one of the “AHA!” moments where I was digging through my pantry and looking for anything to use up in my fridge. I kept seeing my yellow tomato on my counter all week and went back and forth in my head: 1.) why did I buy it and 2.) what I could do with it besides just put in a sandwich or salad.
I had seen a recipe somewhere about a citrus dressing and the minimal ingredients it called for and once I put two and two together, I knew I had to just go with it and see what happened!
BOOM! This salad was born!
I feel this is the perfect way to welcome summer. Nothing says summer like fresh produce tossed together in a light, refreshing dressing on a hot summer day. Who want’s to be standing over a stove or in a hot kitchen this time of year anyways? If you’re like me, want something quick, fresh, and healthy so you can get back outside! Another reason this salad is great. It’s travels well so it’s great for picnics and BBQs too.
I used reduced fat feta cheese to watch the calorie intake and jarred beets since they’re packed in a tangy vinaigrette that enhances the flavor of the salad. Use what you have though. This is an easy salad that would sure to please anyone no matter what you put in it!
This makes one serving, so double up if you’re bringing for a crowd.
Ingredients:
1 Tbsp of reduced fat feta cheese
1 small yellow/heirloom tomato
1/2 c baby carrots, chopped
1/4 c jarred beets (I used Trader Joe’s)
2 medium celery branches, chopped
1/4 c chickpeas, rinsed and drained
1 Tbsp olive oil
1 Tbsp apple cider vinegar
1 tsp honey
Salt and Pepper
Method
Mix carrots, celery, tomato, beets, chickpeas, and feta together in a bowl.
In a separate bowl, combine olive oil, apple cider vinegar, honey, and salt and pepper
Pour dressing over veggie mixture and toss together
Grab a fork and enjoy!
Your Turn:
What is your go-to summer side dish?
What are some healthy pantry staples you like to keep on hand?
What is your favorite thing you love about summer?
So far so good with my marathon training and balancing life, school, teaching classes, training clients, boyfriend and social life, and internship…LOL. Really though, I am pleasantly surprised with how well I’m doing so far. *Knocks wood.* I am very busy, but if you know me, you know I LOVE that and wouldn’t want it any other way. This week in particular has been a whirlwind and I feel quite tired, but also invigorated. I saw a quote this week that said, “I am so exhausted today because I was busy being so awesome YESTERDAY.” That’s how I’ve felt lately. And it’s a good thing. I’m also really excited to sleep in tomorrow morning for this reason. It’s the little things that count.
This week I shared a cool new core move that I shared on my Instagram. Since I’ve been tired this week, I just wanted to get it all done in as little as one or two moves. I also wasn’t feeling totally creative, like I said up top, so combining total core with a burst of low abs sounded like a good challenge to me! Make sure you keep your core tight, pressing it into the ground. Try not to let your low back pop up as your legs come down for the flutter kick. As soon as you feel your low back arch, you’ve gone too far! Keep your core tight and neutral.
Owning you, Monday!
This move works the entire core and gets you burning up in half the time! I was like ‘what can I double up on that let’s me get everything done in one or two simple moves?’ –> then BOOM. This move was born. I was toast guys!!!! Seriously it was really good. I didn’t need to do another move because this one got it all. Can I get an AMEN? Core done: CHECK! I love when I surprise myself with my creativity on days I’m feeling meh.
As much as I love doing large muscle groups and finishing them with core, I was just into doing just core and cardio and that’s it this past week. I wanted to be done with it in thirty to forty minutes max (I can typically spend about an hour, hour and fifteen depending on what I’m doing). We all have places to go and things to do, so this is where this workout came in handy the most.
I’ve talked a little about plyometric (plyo) moves before and they’re making their way back to my workouts. Plyometrics are movements that involve power, speed, and high intensity cardio. They’re great for HIIT and workouts like this one. Fast, challenging, and powerful. I never used to like them because I felt uncoordinated and slow. But after reading about how they can benefit my running and overall cardiovascular system, I reluctantly decided to add them. From there, I’ve grown to LOVE them. I add them for high intensity and burst of cardio where space is limited or I’m short on time. I especially love them for my HEAT class I teach since it’s always a good challenge and doesn’t require equipment–another bonus!
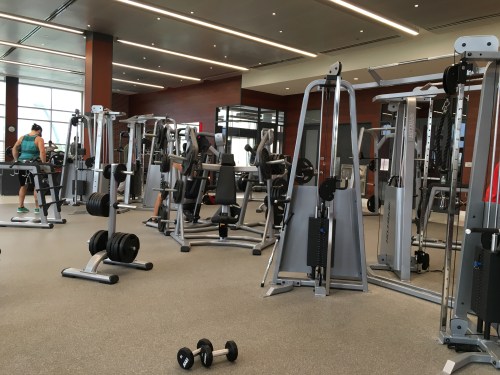
Checked out the new University of Tampa fitness center this week! Gorgeous facility.
Combined with marathon training, I’m still keeping my three times per strength training days. I’ve been at this for awhile and really like how it’s fit into my schedule. Especially with my training and upcoming milage, it’s so important to stay strong and injury-free. Twice a week total body plus a quick thirty to forty minutes of a workout like this one is a perfect way to get in strength workouts.
No equipment necessary for this! All you need is a mat/towel, a water bottle, and some motivation and that’s it. 😉 Get that core working and heart rate up and you’ll be done in no time.
Core + Plyo Workout
* using a weight. I used one twelve pound weight and had a ten pound nearby
Three-four times total for each round going from one exercise to the next
Rest at the end thirty seconds to one min before repeating
Start with each exercise doing forty-forty five seconds each and work up to a minute
-Overhead crunch + flutter kick*
-Russian twist + bicycle crunch
-Scissor kick + leg lift*
-Lateral bounds + single leg hop
-Side shuffle burpees
*Repeat 3-4 times*
In terms of marathon training, I started last week. Again so far so good. Since having done one already, I feel confident about my training and what works and doesn’t work for me. Of course, there is always something to try and glitches to sort out which makes each training special. I’m following Hal Higdon’s Intermediate I program with a few new changes I’m throwing in. I’m adding two days of speed work and one bridge run. My race has two bridges and yes, I knew that when I signed up. My first race was flat so I figured it was time to add a new challenge. I’m tracking my food via MyFitnessPal. Strength training three times per week. Lastly, I’m adding hip and ankle mobility work since I’m as stiff as a board and am learning through my internship that I really do need to improve this. I’m determined NOT to break with my upcoming milage! My ultimate goal is finish in one piece and injury free and I feel adding the mobility work will really be a great addition! Keeping with minimal drinking and good sources of carbs, proteins, and healthy fats. Carbs are a forever friend when it comes to marathon training!
Five miles done before the sun
One component I’m particularly excited about is to have my boyfriend, Harrison, be part of this training. He’s into being fit (mostly lifting upper body…I help gotta help with some lower body stuff) and running for health. He’s really supportive and is excited for me and the upcoming training! I’m hoping when he’s not studying, and when I’m not too, I can get him up early to ride his bike alongside me on my long runs. If anything he’s great at keeping me accountable. We both get up early so we text/call each other to make sure where up and moving. For me, I text him when I’m about to leave on a run and when I get back, especially when I run early in the morning. I told him a lot of carbs are in the near future so he said he would be down to keep me accountable with making sure I’m well fed. HAHA. My kinda guy. 😉
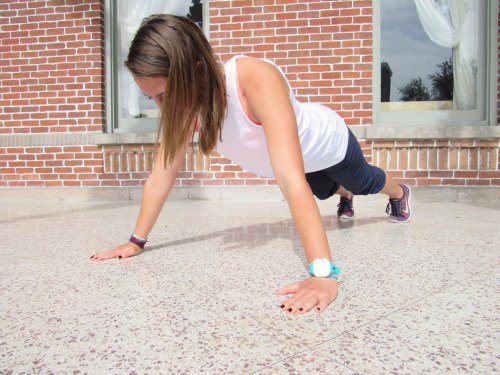
Happy Friday!! Figured I’d add a workout-type post this week since I’ve been switching up my planks lately. I practice a lot of them on myself and then add them to my workouts for my HEAT class and with my clients. In case you’re reading this and am like, “hmm what”- listen here!
Standard Forearm Plank
I LOVE planks let me tell you. If I can’t figure core-wise what I wanna do, my go to is a plank of some kind. There’s so many options and you don’t need any equipment to get the most of this exercise. Switching your arms, legs, and movement patterns throughout your torso and you’re bound to challenge yourself differently every time.
A plank is an exercise used to isolate your core (abs and low back). Planks are all about contracting, namely through isometric movement, known as holding/squeezing.
Tips to good plank form:
Back flat
Butt down
Hands under shoulders (modified plank)
Forearms/elbows unders shoulders (standard plank)
Breath!
Planks are all about time. No need for counting any reps. What I would suggest to someone doing a plank for the first time is focus on good form first. Time doesn’t mean as much if the form isn’t there. Seeing yourself in a side view using a mirror using my tips above is the first step. However you hold yourself, keeping the core tight and engaged is key to get the most out of your plank. The goals is to have good form first, then start the timer!
Once your form is good, start the timer and hold as long as you can until you lose form. Once form is lost, stop the timer and make a note of the time of course!!! 😉 Adding five to ten seconds at a time with good form is a good way to start. Working up to fifteen seconds then to twenty, thirty, ultimately a min or more is the goal!
Modified High Plank (hands come under shoulders here ;P)
Hey Hey! It’s FriYAY and I’m excited to share with you this yummy weeknight vegetable side to use with basically anything all week long. So when I started to come up with my meal prep and veggie ideas last week, I wasn’t quite sure what I wanted to do. So I just walked around the produce section at Trader Joe’s until I found something remotely appealing to me. Sometimes that’s how I shop, FYI. Not all the time because I do go into the store with some kind of game plan, but I took the opportunity for the veggies to find me, so to speak, lol.
Broccoli spoke to me that day! It was also a good price, which helped. Then I remembered that I had a red onion I could put with it and saw the colors of the two of them together and knew that was it. I’m all about throwing whatever into a bowl and calling it a meal anyways, so I figured roasting could work the same way. I ended up roasting the two together with olive oil, thyme, garlic, salt, and pepper and called it a day!
Best vegetable side in a while if you ask me! Super easy too since the oven did all the work for me. I just cut up the onion and broccoli then lined the baking sheet with foil and took care of the cleanup too. Ultimate WIN. The whole process took me about twenty minutes with prep and clean-up. If you ask me, THATS how you meal prep. Or as I like to call it, minimal meal-prep. 😉
Since this is pretty versatile, I found myself throwing this onto a salad or having as a side. You can also eat this warm or at room temperature. Anything goes with this if you ask me!
Roasted Broccoli & Red Onions with Garlic and Thyme
1 head broccoli
1 medium red onion
2 Tbsp olive oil
Sprinkle of thyme (fresh or dried)
Sprinkle of garlic powder (or fresh)
Salt and Pepper
Preheat oven to 375 degrees and line a cookie sheet with foil. Chop broccoli into pieces leaving it in bite size chunks. Cut red onion into chunks. Spread onto cookie sheet. Drizzle olive oil over veggies and toss to combine. Shake thyme, garlic powder, salt, and pepper and toss again. Put into oven for 15 minutes until broccoli and onions are slightly browned. Enjoy warm or at room temperature! (Note: coconut oil would be a good option too!)
Happy Friday friends!! Its been a while since I posted a workout, so I figured I’d share a bit of what I do with my HEAT class and what I do with them since I do a fair share of plyometric moves in a bit of each of my class’s and my own workouts.
In case you’re wondering what plyometrics are, plyometrics (aka plyo) are a form of cardio using intense amounts of effort in a short amount of time. I do a combination of them in between different exercises to add an extra challenge and calorie burn or lump them all together for longer duration to focus on cardio alone. It’s really whatever you like!! A few examples of plyo moves are lateral bounds, depth jumps, vertical jumps, box jumps, power push-ups, medicine ball throws, and last but not least–burpees. The factor that makes these “plyo moves” is the added burst of intensity, namely the jump/throw movement or using the word “power.”
With plyometrics comes with impact, just FYI. These movements aren’t something you do for long periods time because they’re intense, you don’t need to do them for long to get benefits. The longer you can go, the better you’re getting at them! Although that’s not a bad thing since it shows your improvement, it means you can also make it more challenging ;).
So you might be reading this and thinking, that you’re not up to that level or you’re coming back from an injury (do I hear cranky knees?)…that’s okay! The best part is that plyo moves offer modifications so anyone can do them! I admit, I was not great at them off the bat, in fact I was terribly uncoordinated. Wait, I kinda am still uncoordinated jumping and moving around at the rate I’m going, but overtime I worked up to it using modifications. As a result of working at these, I look more put together as a result too! Yay to looking less clumsy and more coordinated! 😉
Guess what the secrets are? You’ll be more apt to try them knowing you can drop the intensity and still get benefits with these modifications:
ELIMINATE THE JUMP OR POWER MOVE! Yep, simple as that. Lateral bounds without the hop in between, box jumps with alternating high knees, medicine ball press without the throw/catch. Wanna make it tougher? Add the jump, but jump HIGHER or onto something higher, throw a heavier ball, or simply increase time or reps.
Go At Your Own Pace – Just like standard cardio, go at a pace that feels comfortably hard for you. Keep in mind the talk test. If you’re huffing and puffing and can speak in short choppy sentences, you’re doing it right. If you’re at a conversational pace, you can up the intensity.
Time Work and Rest According to Ability – You’re putting through an intense amount of work in a short period of time, ya gotta rest to replenish! So how long do you rest? I’d say work for as long as you rest. An example would be work for thirty seconds then rest for thirty seconds. My sweet spot for these is forty five seconds. A period of time between thirty seconds to a minute is a good amount of time to start. Again, this is whatever you like! So think outside the box too. Twenty seconds of work and ten seconds rest is really good and tough! (aka tabata!) Try four times of work and four times of rest. Play around and see what you like.
If you’re doing lateral bounds for thirty seconds and feel tired, but not wiped you’re doing them right. Pair that with a thirty second rest and you should feel ready to tackle another hard thirty second bout again. Making the movement intense for that amount of time should leave you feeling fatigued but not so wiped you can’t continue. If you do get to that point of fatigue, instead of completely stopping, MODIFY! Remember my suggestions at the top? This is when you can use them! You still get benefits of the movements even with the modifications.
So behold, by plyometric workout below! I’ve added the plyo moves in between other moves like this one here, but doing them at the end when you’re tired is good too!
Plyometric Workout with Odd & Even Numbers
Format: Two times through each round, two times through with plyo moves*, sprint once after both rounds then rest after last round for one minute.
Lower Body = 15x, 20x; Odd Rep Plyo Moves*
-Squat Jumps
*9 burpees
-Sumo Squats
*7 burpees
-Reverse Lunges (15 and 20 reps both sides)
*5 burpees
-Wide/Narrow Squats
*3 burpees
~Sprint~
Upper Body= 15x, 12x; Even Rep Plyo Moves*
-Power Pushups
*10 lateral bounds (double count- left and right sides equal one rep)
Happy Friday! Meal prep seems to be a common thread everyone seems to be battling with at one point or another. It also can be intimidating AF because where do you start?? I’ve had a few thoughts, which have turned into excuses:
I don’t meal prep AT ALL and I end up paying for my laziness by eating out and choosing less then healthy options
I’m not sure what I’m in the mood to cook
I’m not in the mood to prepare it
There’s other things I’d rather be doing and meal-prepping isn’t one of them
Have you had these thoughts? I have, but have limited them and have changed them for the better. Once I meal-prep, I can officially consider myself set up for success. I spend less money, feel the need to not waste food, and having it prepared for me gives me ZERO excuses for eating healthy. Three killer reasons why I make these reasons alone the reason I *try* and do this every week.
On the other hand, life happens and this doesn’t always get done. And guess what? Does the world end that I didn’t meal prep? NO! Does that mean I’m not gonna be set up for success and therefore fail with my meal choices? NO! It just means I have free reign…both good and bad 😛
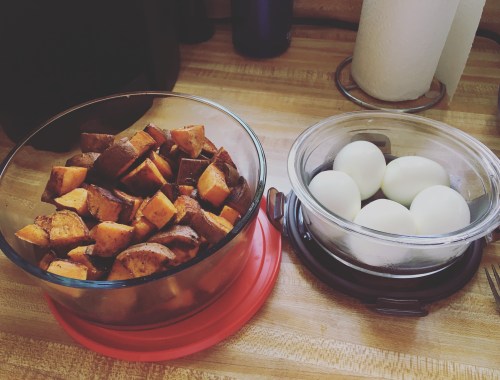
Roasted sweet potato with salt, pepper, olive oil, and cinnamon; hard-boiled eggs
So the question is, how do you fit it in?
I start by figuring out what I’m in the mood for that week. Sometimes I know instantly what I want. Other times I look through my Meals on The Run cookbook from Runner’s World, use Instagram for inspiration (check out #bgbcommunity on Instagram–you’ll be drooling over your phone in no time HA!), or tbh–the grocery store itself, although I try not to do that too often. I find flavors or ingredients that interest me or I look at factors of a recipe like time and servings to decide.
For me, I prep on Sundays. It’s a slower day for me usually so I grocery shop then come back and whip up whatever I’m making so its fresh and ready to use. I like one-pot meals a lot or one-bowl type dishes like salad since they’re both something you heat up or assemble in as little as a half hour and it’s ready to eat! I don’t have time to stand in front of a stove and cook fresh every. single. night. and I’m sure you don’t (or want to) either. So why make it tougher then it should be? Meal prep for the week ahead and you’ll have a fresh, healthy meal at your finger tips!
There are weeks I don’t have time to make a full blown meal with all the fixings on a Sunday, or I simply just don’t want to. But instead of not doing nothing at all, I pick one or two items that are quick cooking so I have at least some kind of snack, vegetable, or carb ready to be thrown in to something during the week. Recently, I love cooking hard-boiled eggs, which take about fifteen minutes, and sweet potatoes which take about twenty. Both go at the same time and you don’t really need to watch either too closely! Between the two, both are done in about an hour or less. Seriously, NO EXCUSES! And even though it isn’t “meal prep” it’s more like “meal prep-prep” it’s still setting you up for success in one form or another right? Isn’t that the whole point??
Another thing that doesn’t always come with the actual prep, but something to keep in mind, is how much food you’re really getting out of the food you’re making. I cook for me, so I pick dishes that have about four servings in them. That number works for me because I get bored of eating it as the week goes on–for real though and once I get bored of it, I tend to waste it which doesn’t do my wallet any good. Any dishes six to eight servings, I tend to not look too closely at just because it feeds too many for just me! Looking at how many you’re cooking for and who you’re cooking for (hungry husbands, a family, someone who always traveling/on-the-go) is one factor I feel is most important when it comes to meal prep.
Now the type of person you’re feeding is another whole topic in itself since you want to please whoever you’re feeding too. Getting the kids, husband, whoever involved will make meal-prep an easier thing to tackle. If it just you, like it is just me, make whatever you want!! #perksoflivingalone
The funnest part of the whole meal-prep idea is the CLEAN UP! lol…just kidding. It’s my least favorite part of the whole thing to be real, but it’s gotta happen. You can make it easier by using foil or parchment paper to make clean-up easy too. Here’s a tip: DON’T use Parchment paper to broil hahaha. I made that mistake and I created a small fire in my kitchen one night making mini english muffin pizzas. All is good!! I put it out but instead of Parchment paper, use foil instead *face palm*–no flames to worry about with that. Anyways, clean-up is cut in half and makes the whole meal-prep process that much smoother.
Hoping this post leaves you feeling more inspired to try meal-prepping! Taking it step by step and not feeling intimidated is key. See it as a learning experience! Either you’ll enjoy learning to cook new things or you won’t…and in the latter case you know you at least made an attempt!
Good Luck and Happy Meal-Prepping!
YOUR TURN:
-What are you favorite go to snacks or dishes to meal-prep?
-What is one thing you want to work on or try with meal-prepping?
-Any fails with meal-prep or kitchen disasters? LOL
Hey All!! It’s almost half way through the week. YAY! I’ve been trying a few new ideas for my pre-workout snacks as well as adding my usual ones. Try these out to fuel your workouts for the week!
When picking healthy snacks, I typically pick something that has a good balance of carbs and healthy fat mixed with a little protein. Nothing heavy or anything that requires much prep because remember its a SNACK–something small to get you through without weighing you down. Let the weights take of that instead. 🙂 They’re filling, easy, and full of only the good stuff. If you can, prep these in advance so you have them all week long.
These snacks can all be swapped for something vegan, gluten-free, dairy-free, or vegetarian. I do like dairy and don’t have a nut allergy, which is what I typically used for these snacks. Feel free to use what you have in your pantry. No special grocery trips here. 🙂
Trail Mix
-I love this mix because you throw everything into a bowl and that’s IT. A salty-sweet crunch with healthy fats from the nuts, easy digestible carbs from dried fruit, and whole grains from the Cheerios. I like Trader Joe’s selection of nuts and dried fruit for this mix the best. When measuring each into a bowl or bag, I’d say less is more. If you over fill the bag, your portions get large fast! (if you’re doing single servings). I try and keep this is mind because of the nuts since the healthy fats are usually dense in good calories. This makes enough for one serving so it’s perfect for pre-portioning and having them ready through the week! Just remember to store them in a cool, dry place.
1/4 cup Trader Joe’s mixed nuts lightly salted and roasted
1/4 cup Trader Joe’s dried pitted cherries
1/3 c Multigrain Cheerios
Handful of Semi-sweet chocolate chips (optional but completely worth it)
Celery & Peanut Butter with Pretzels
-For peanut butter, I buy whichever one is on sale so I don’t have a brand preference. I love to hate peanut because of the price (BOGO is my friend at Publix) and the calorie content *insert crying emoji face* such a tease because it is SO good! The pretzels are really good with it too. Its a great salty-sweet crunch that’s hard to beat!
Hard-boiled Egg on Toast with Gouda Cheese and Salt and Pepper
-I cook my eggs in advance so they’re the perfectly convenient way to get in protein. Sometimes I even have this for breakfast its so good and filling yet light. Gouda cheese is my favorite, no other reason. Bread-wise, I buy Rudi’s Multigrain Gluten Free bread. This would be good on an english muffin too.
Non-Fat Plain Greek Yogurt with Multigrain Cheerios, Honey, & Fresh Fruit
-I never used to like plain yogurt, in fact I rolled my eyes because it reminded me of sour cream. I didn’t actually starting liking it until I saw how much SUGAR was in my flavored yogurt. It was basically dessert for breakfast. So there went that idea. Now, I sweeten my plain yogurt myself with real flavors. 😉 Multigrain cheerios give it a crunch, honey adds a naturally sweet flavor (of which you don’t need much) and fresh fruit for added antioxidants, fiber, and color.
Hey Guys! I’ve been going through my pantry and taking some mental notes of recent ingredients I been into lately. Of course I have my staples I buy every week like yogurt, eggs, fresh veggies, meat, etc. but some of the meal prep I’ve been doing involved a couple new additions. For a while I wasn’t great about meal-prepping every week because I simply didn’t feel like it. Lately I was going through some blogs, namely The Blissful Balance, my girl Christina’s blog and Cooking Light for some inspiration for meal prep ideas, because we all need a little motivation to spark our interest right?! 😉
I’m a carnivore and really enjoy meat, but I wanted go on the lighter easier side and go meatless for a change. I also felt super lazy when it came to cooking meat and keeping an eye out as it cooks. Not feeling it. I saw how lentils are a meatless alternative and found a great one-pot dish for it. The dish lasted me the WHOLE DAMN week! All dinners Sunday through Thursday and I didn’t get tired of it because it was THAT good! With wilted spinach and parmesean cheese (which can be opted out for dairy-free if vegan) on top, it was easy to reheat and enjoy (almost) every night of the week.
Aside from being an easy/convienent dish, lentils are great for you. They’re full of fiber, high in protein and iron, and have a meaty satisfying feeling to them. They’re also great with most things and can easily be used as a side among other ingredients. I can see how vegans and vegetarians really enjoy them. As delicious as they are too, they’re CHEAP! I mean really. Not a bad price for a 16 oz bag. I think $2-3. I don’t remember an exact number but I don’t recall cringing at the price. Filling up on a budget, that’s what I like to call it.
Another favorite has been sundried tomatos. They come jarred and if they’re an option, picking the ones in olive oil is your best bet. They’re full of flavor and go well in anything! I love them in salads or snacking on them among mozzarella cheese and crackers or bruschetta *drooling*. Going Italian and I’m not complaining, note: not one bit of me is Italian…lol! I was disappointed when I ran out when making my mini english muffin pizzas and realized I couldn’t use them. SO SAD. Thinking of having the tomatoes as a staple for last minute ideas since they have a decent shelf life as well. I love the flavor they have, that roasted and savory flavor! Packed with goodness, its an item that’s gotta be on your shelf. Aside from how great they are to have in your kitchen, tomatoes are a great source of antioxidants, are full of water keeping you satisfied, and is a fat free food, just to name a few!
If you’re thinking you wanna try these two ingredients, here is the lentil recipe I used from The Blissful Balance. Again, very filling and it went along way! I also included another recipe using lentils but in a greek style type salad that is ready to eat straight outta the fridge thanks to Cooking Light. Hope these two ingredients and recipes sparked your interest as they did mine. Enjoy!
If group fitness isn’t your thing but working out alone is (or in a small group), this workout is perfect for you! I especially love how its about forty minutes and a total body routine. The only difference with this one compared to other workouts I’ve posted, is that it requires weights. Bodyweight is great, in fact I use it primarily with my bootcamp classes, but weights are a great addition too! Have no fear–added resistance makes it challenging, ups calorie burn, and gets your heart rate pumping fast. And LADIES–this will not make you bulky–it is physically not possible. Ya girl wrote this workout remember? 😉 You don’t need a fancy set of weights or be in a gym for that matter either. Bonus points if you own your own set! I recommend you pick a weight about five to eight pounds or having a heavy set either of tens or fifteens. Pick weights that fit your ability but are still moderately challenging. I like to say that the last few reps (~3) of a set are challenging/fatiguing but do-able. This workout is a push/pull concept which means that each set is grouped by movement, i.e pulls would be rows, bicep curls etc. and push would be chest press, squats etc. You can be as creative as you want! Just think about the movement and build on that. Don’t forget about the warm-up, cool-down, and core! Grab your weights and get ready to get sweaty 😉
Push/Pull Strength Workout
Perform each exercise for a minute each, back to back with minimal rest in between three times total. Rest 1 min after fully completing each round.
Round 1: 3x through
-Chest press (1 min) *push*
-Single arm row (30 sec each side) *pull*
-Jump Squat with weights (1 min) *push*
-Upright row (1 min) *pull*
~rest 1 min after each round~
Round 2: 3x through
-Butterfly arms (goal post arms, bringing elbows together in front of chest) 1 min *push*
-Bicep curl (1 min) *pull*
-Single or double leg glute bridge (30 sec each leg/ 1 min both legs) *push*
-Deadlift (1 min) *pull*
~rest 1 min after each round~
Round 3: Abs 3x through
-Leg lifts (1 min) use without weights *pull*
-Russian twists (1 min) *pull*
-Single/double leg v-ups (30 sec each leg) 1 min*push*
-Crunches (bonus if on exercise ball!) 1 min *push*
~rest 1 min after each round~
YOUR TURN:
-What are your go-to strength workouts?
-How do you beat burn-out with your strength training workouts?
Sooo…I don’t typically post a lot of recipes (my fault) especially dessert recipes but its the holiday season so how could I not?! Everyone loves treats this time of year so I figured why not make some! This recipe is not “healthified” whatsoever. Instead it is full of a of good reasons to try it that will put you in the holiday spirit instead of cringing at the calories. I feel there so many “approved” and “diet-friendly” desserts, which is great because we all have “get healthy” type goals…but sometimes it nice to give up that label for something indulgent anyways. The key is moderation. This recipe is indulgent, but it is also simple, fast, requires no baking, and won’t break the bank/budget friendly! However, it IS very addicting and yummy so enjoy at your own risk, aka moderation. 😉
I tried this recipe using only one bag of white chocolate and one of dark chocolate and it came out too thin. I used two bags of each chocolate instead and it came out perfectly thick! The peppermints also didn’t stick well in the first batch so I sprinkled them on when the white chocolate was warm and gently pressed them in with plastic wrap to eliminate direct contact with my hands. It took me about a half hour to whip up, and while the chocolate set in the fridge I was able to multi-task. For gifting, I bought christmas-y goodie bags from the dollar store and gave them out to some friends and my landlord (who doesn’t like getting food as a gift?!). A win-win I’d say!
Get In The Spirit Peppermint Bark
2 14oz bags of white chocolate chips
2 14 oz bags of dark chocolate chips
1 tsp of peppermint extract
1 Tbsp of vegetable oil
14 oz of peppermints or candy canes
-Start with crushing 14 oz of peppermints in a plastic bag with a rolling pin or heavy mallet until you see small chunks. If you have food processor, pulse 10-15x (I used my ninja and it pulverized them very efficiently and quickly)
-Start with melting both bags of dark chocolate chips in a microwave save bowl with a tablespoon of vegetable oil. Melt in microwave for 1:30 sec at at power level of 50 until melted or in intervals of 30 sec. Combine well to make sure there are no lumps. Spread dark chocolate onto baking sheet lined with parchment paper. Let set in fridge for 30 min.
Once dark chocolate has set, in another microwave bowl, melt both bags of white chocolate with a tsp of peppermint extract for 1:30 sec or intervals of 30 sec at a power level of 50. Combine well to make sure there are no lumps.Take out the set dark chocolate from fridge and spread evenly the white chocolate over the top, making sure to get every edge 😉
-Sprinkle peppermint chunks over top of the white chocolate. Using plastic wrap (not your hands), gently press the chunks into the chocolate so they stick. *It’s important to sprinkle the peppermints into the warm white chocolate so they stay*
-Pop the tray back into the fridge until set. Once ready, break apart into irregular pieces and devour [moderately] (or share and devour with others).